We’re excited to announce the release of Grow CRM version 3.2. This update brings 18 new features and improvements across virtually every area of the platform — from invoicing and payments to support tickets, estimates, proposals, and general productivity.
Version 3.2 focuses on giving your team faster ways to get things done. Whether that’s paying an invoice without logging in, closing a batch of resolved tickets in one click, or triggering an estimate’s automation after the fact — this release removes friction at every turn.
Here’s a detailed look at everything that’s new.
Download Grow CRM v3.2
Already using Grow CRM? This update is available to download directly from inside your CRM.
New to Grow CRM? Get your copy today with free installation included.
Invoicing & Billing
Payments & Gateways
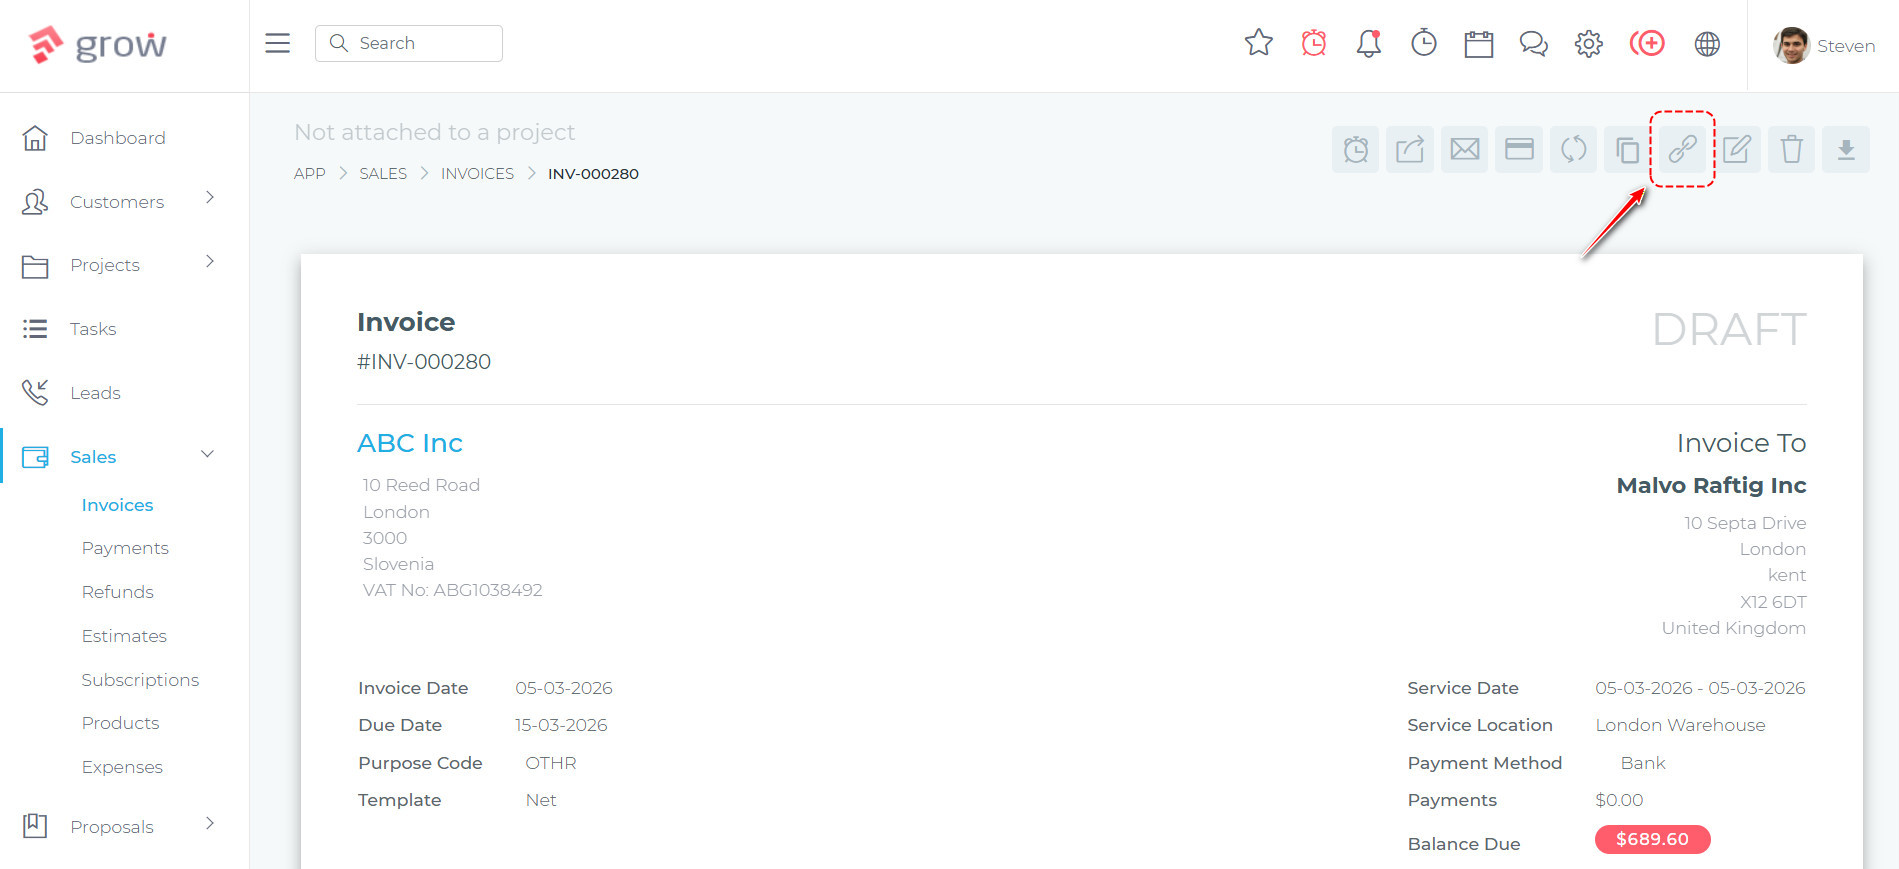
Direct Invoice Payment Links
Clients can now view and pay their invoices without needing to log in to the CRM. Each invoice has a unique shareable link that can be included in email notifications, allowing clients to open the invoice directly in their browser, review the line items, and make a payment — all without creating an account or entering any credentials.
When an invoice email is sent, the link takes the client straight to a clean, read-only view of their invoice. A PDF download option is also available for clients who need a copy for their records. If a client happens to already be logged in, they are automatically redirected to the full invoice view inside the dashboard.
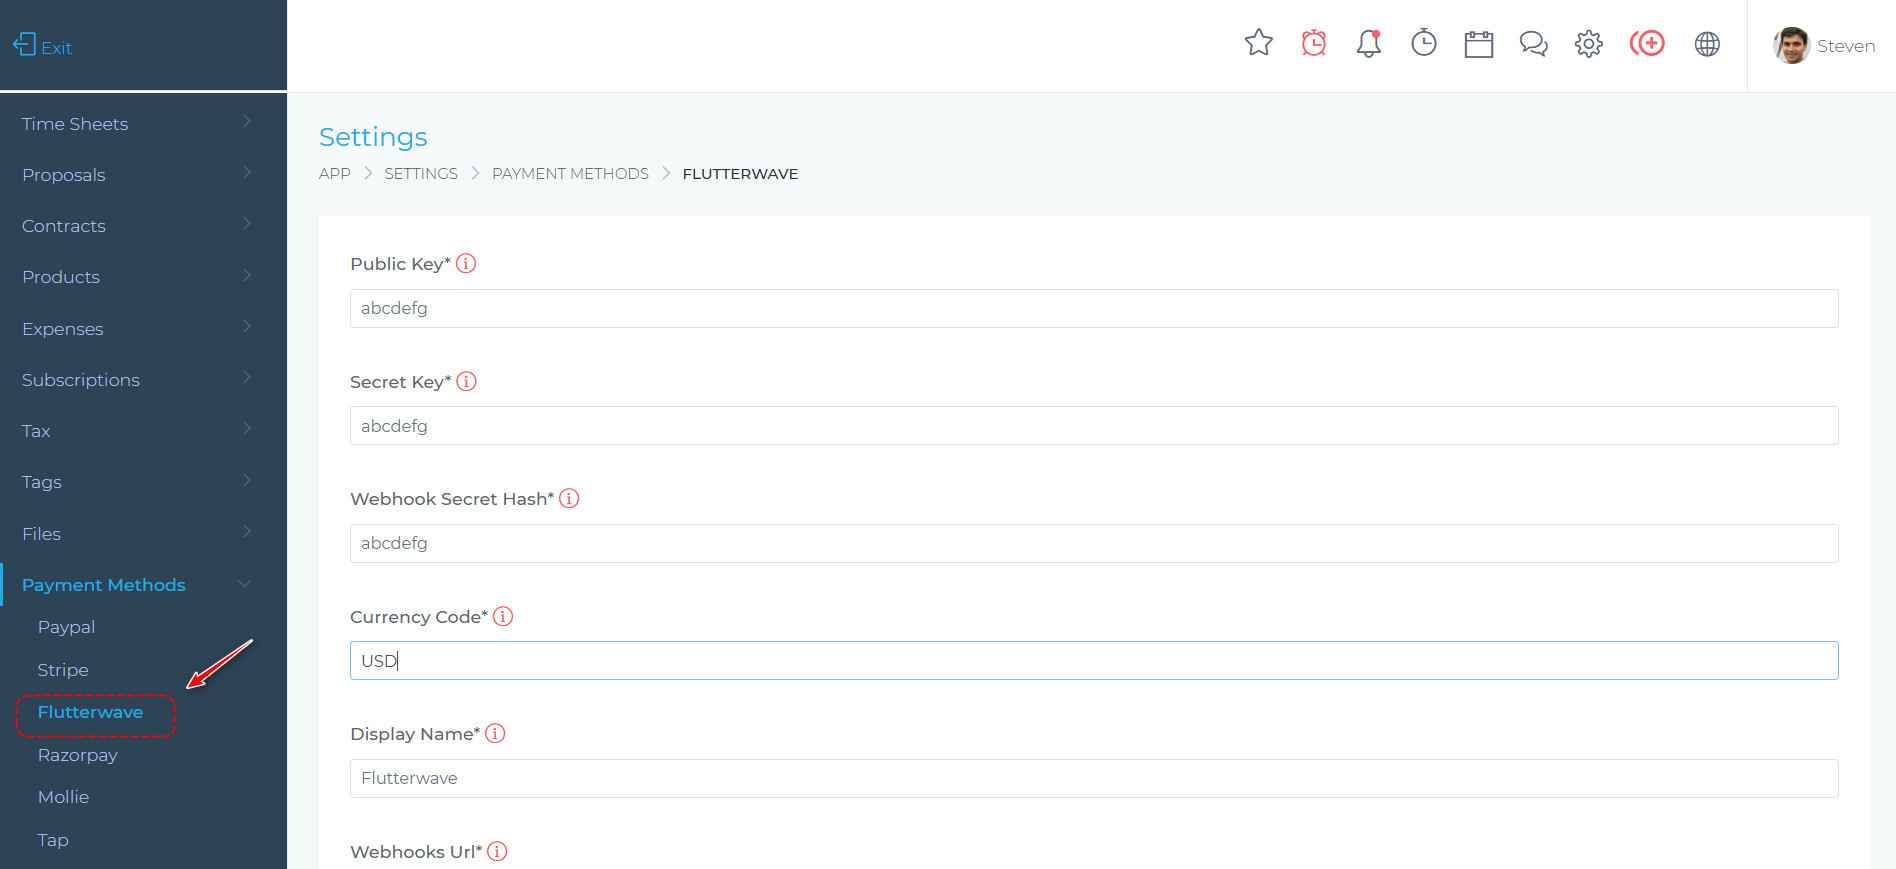
Flutterwave Payment Gateway
Grow CRM now supports Flutterwave as a payment method, giving clients an additional way to pay their invoices online. When a client views an invoice and clicks “Pay Now”, they can select Flutterwave from the list of available payment options. They are taken to Flutterwave’s secure hosted checkout page where they can complete the payment using cards, bank transfers, mobile money, and other local payment methods supported by Flutterwave.
Once the payment is confirmed, the CRM automatically picks it up and updates the invoice status — no manual intervention required. This is especially useful for businesses with clients in Africa and other regions where Flutterwave has strong payment method coverage.
Invoice Management
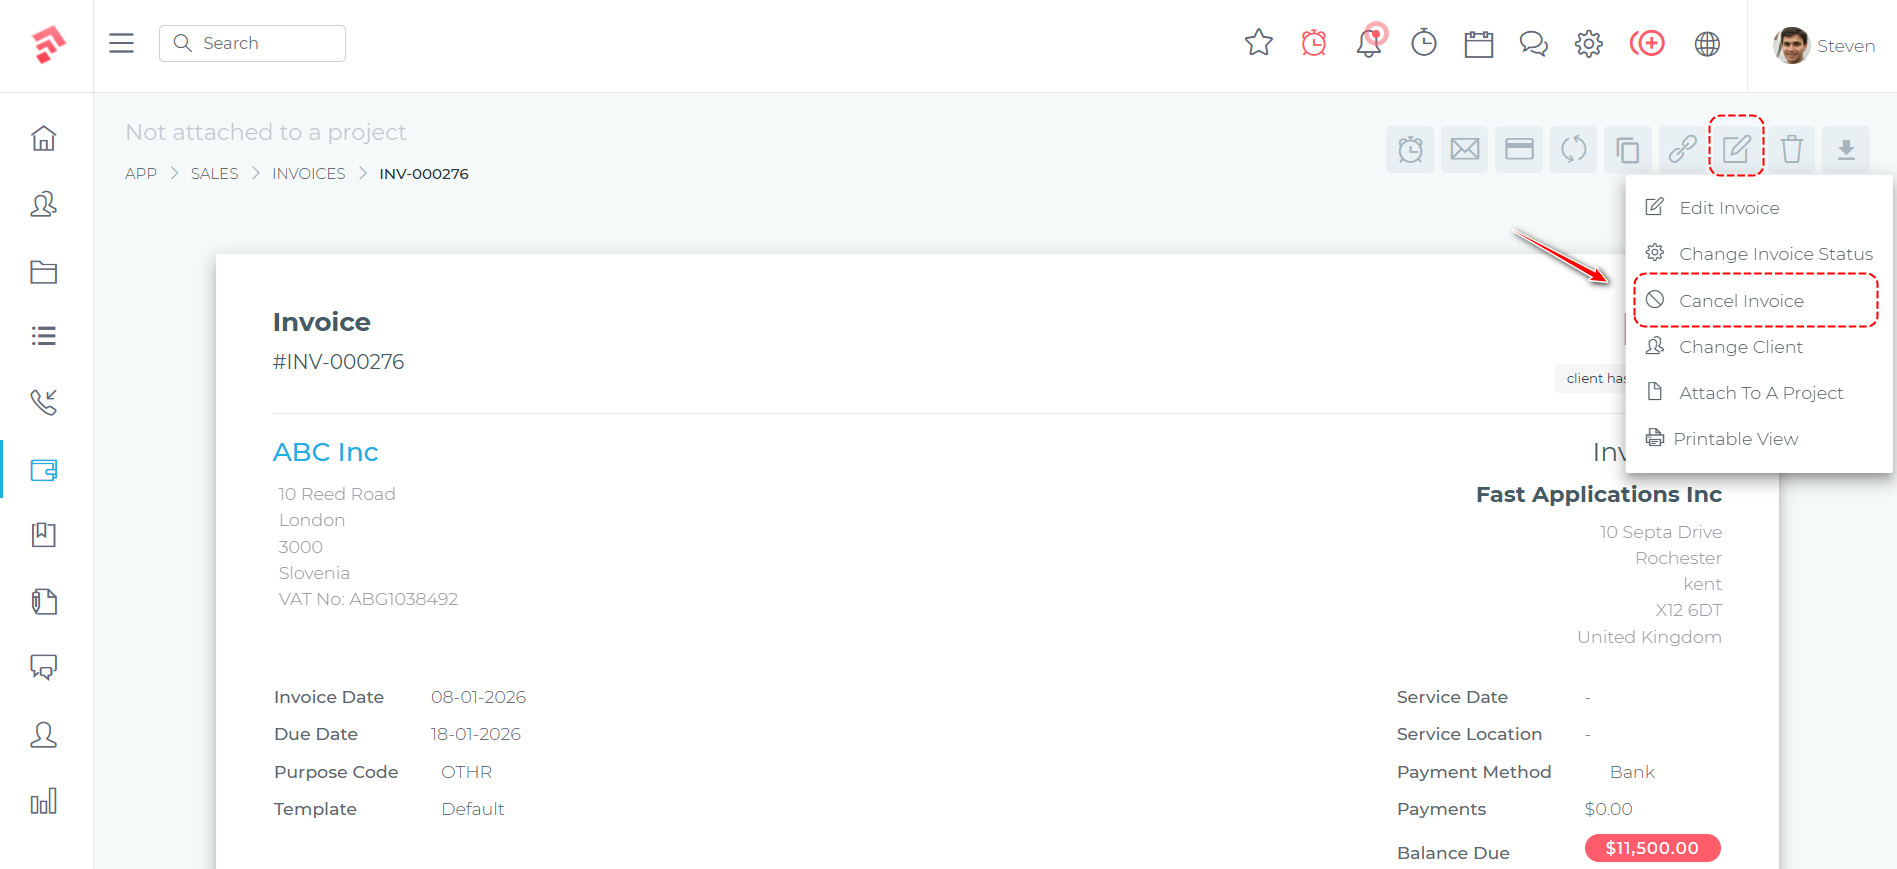
Cancel Invoices
Invoices can now be formally cancelled rather than simply deleted, giving businesses a proper audit trail for invoices that will no longer be fulfilled. When cancelling, the team member is required to enter a reason, which is recorded against the invoice for future reference.
If the invoice has already been paid, an optional checkbox allows all linked payments to be refunded at the same time — saving a separate step. Once cancelled, the invoice displays a clear notification banner showing the cancellation date, the team member who cancelled it, and the reason provided. Cancelled invoices remain in the system as a permanent record.
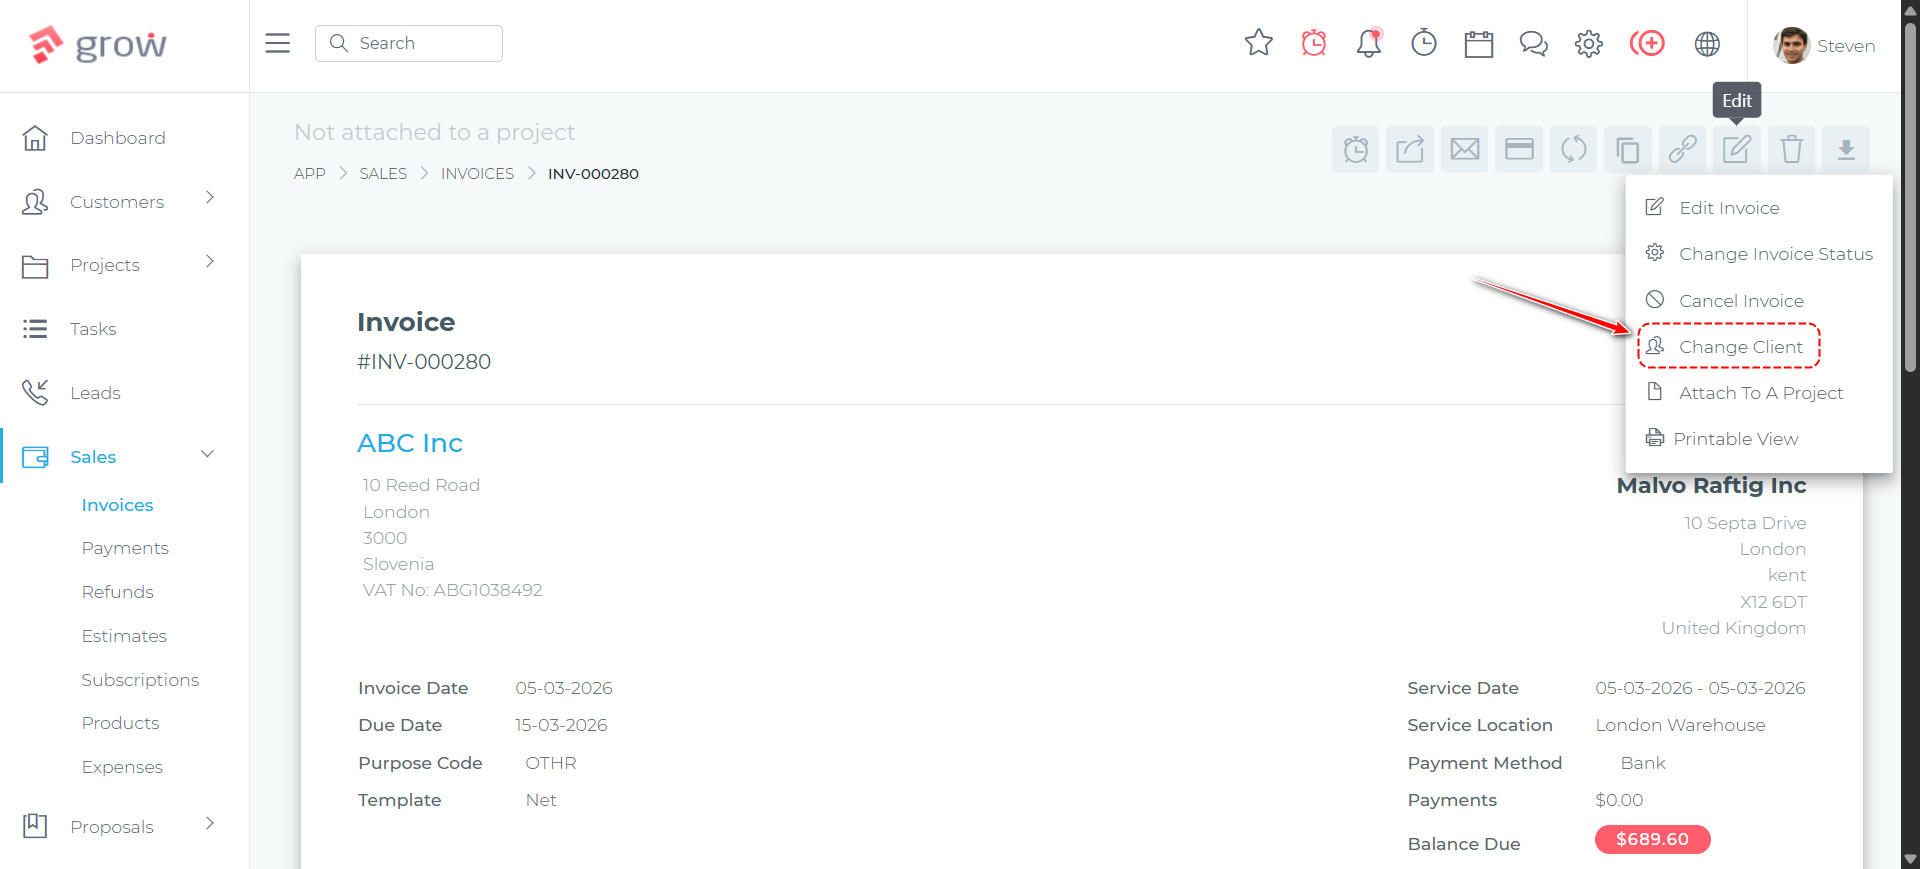
Transfer Invoice to a Different Client
You can now change the client on an existing invoice and transfer it to a different client. This is useful when an invoice has been created against the wrong client, or when a project or agreement has been reassigned within your business.
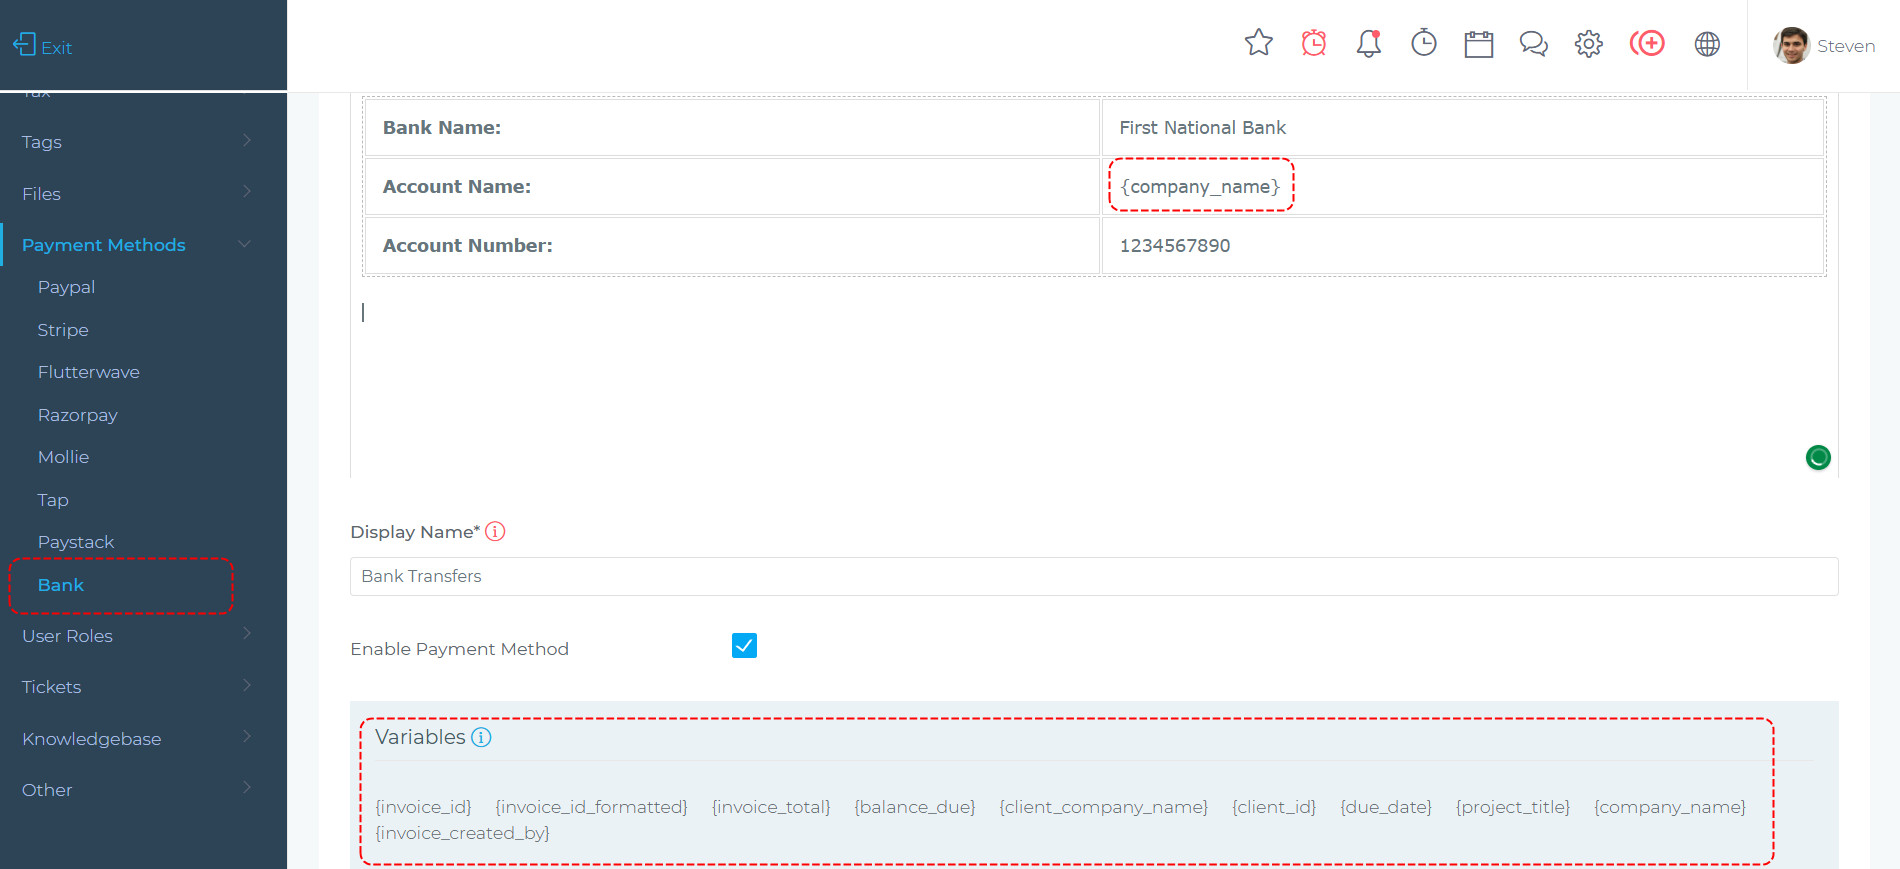
Data Variables in Invoice Bank Details
When clients choose to pay by bank transfer, the payment details they see can now include dynamic variables that are automatically resolved for each invoice. When updating your bank details via the Bank Payment Gateway settings, you can use invoice-level variables such as company name, invoice ID, invoice total, and due date.
This makes it straightforward to set up a customised payment reference — for example, a reference that automatically includes the client’s company name and the invoice ID, making incoming bank transfers much easier to match and reconcile.
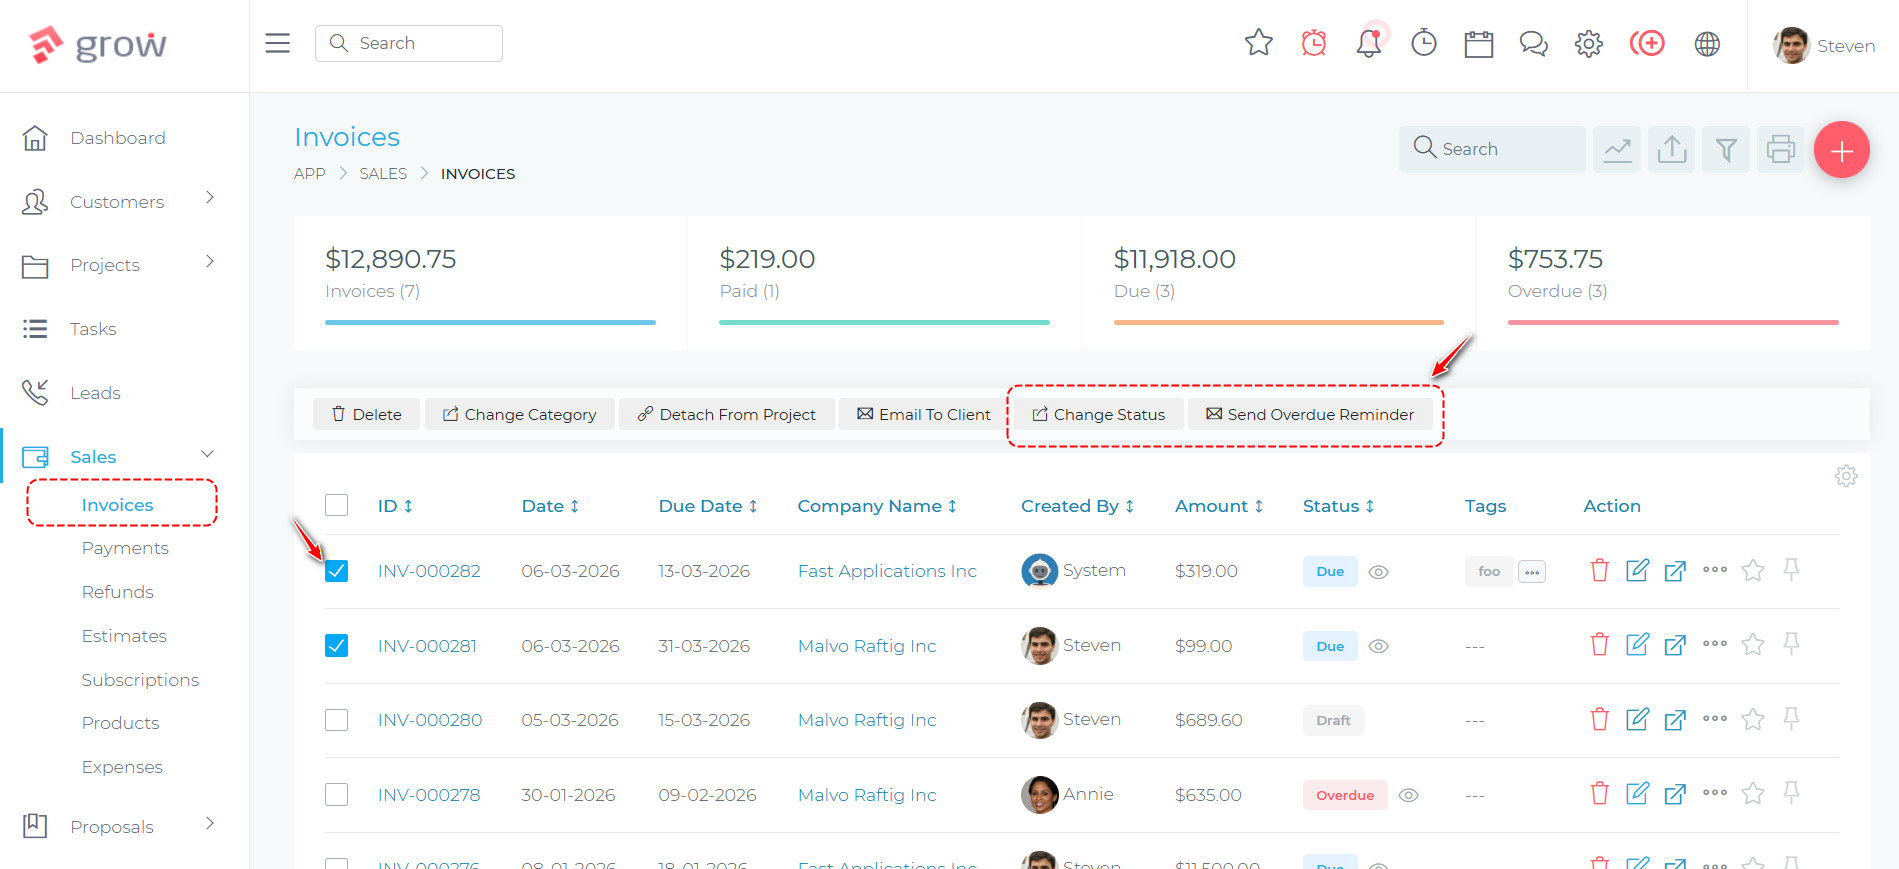
New Bulk Actions for Invoices
Two new bulk actions have been added to the invoice list, making it much faster to manage large volumes of invoices at end-of-month or when chasing overdue accounts.
- Change Status: Select several invoices, click “Change Status”, choose the new status from a dropdown, and all selected invoices are updated in one step — no need to open each invoice individually.
- Send Overdue Reminder: Select overdue invoices, confirm the action, and reminder emails are automatically queued and sent to the relevant clients for every selected invoice at once.
Payment Refunds
Track & Manage Refunds
Payment Refunds
Grow CRM now includes a dedicated Refunds feature, giving teams a structured way to record and track when a payment has been refunded to a client. When a payment is refunded, a member of the team can log the refund directly from the Payments list using the new “More” dropdown — no need to navigate away. The refund is tied to the original payment, and the payments list clearly shows which payments have been refunded with a status badge and a linked refund ID.
Refunds also have their own dedicated list page, allowing teams to view, filter, and manage all refunds across the business in one place. Each refund has a printable receipt showing the refund details alongside the original payment information.
On the financial reporting side, refunded payments are automatically excluded from income totals in the Income Statement, so reports stay accurate without any manual adjustments.

Support Tickets
Creating & Managing Tickets
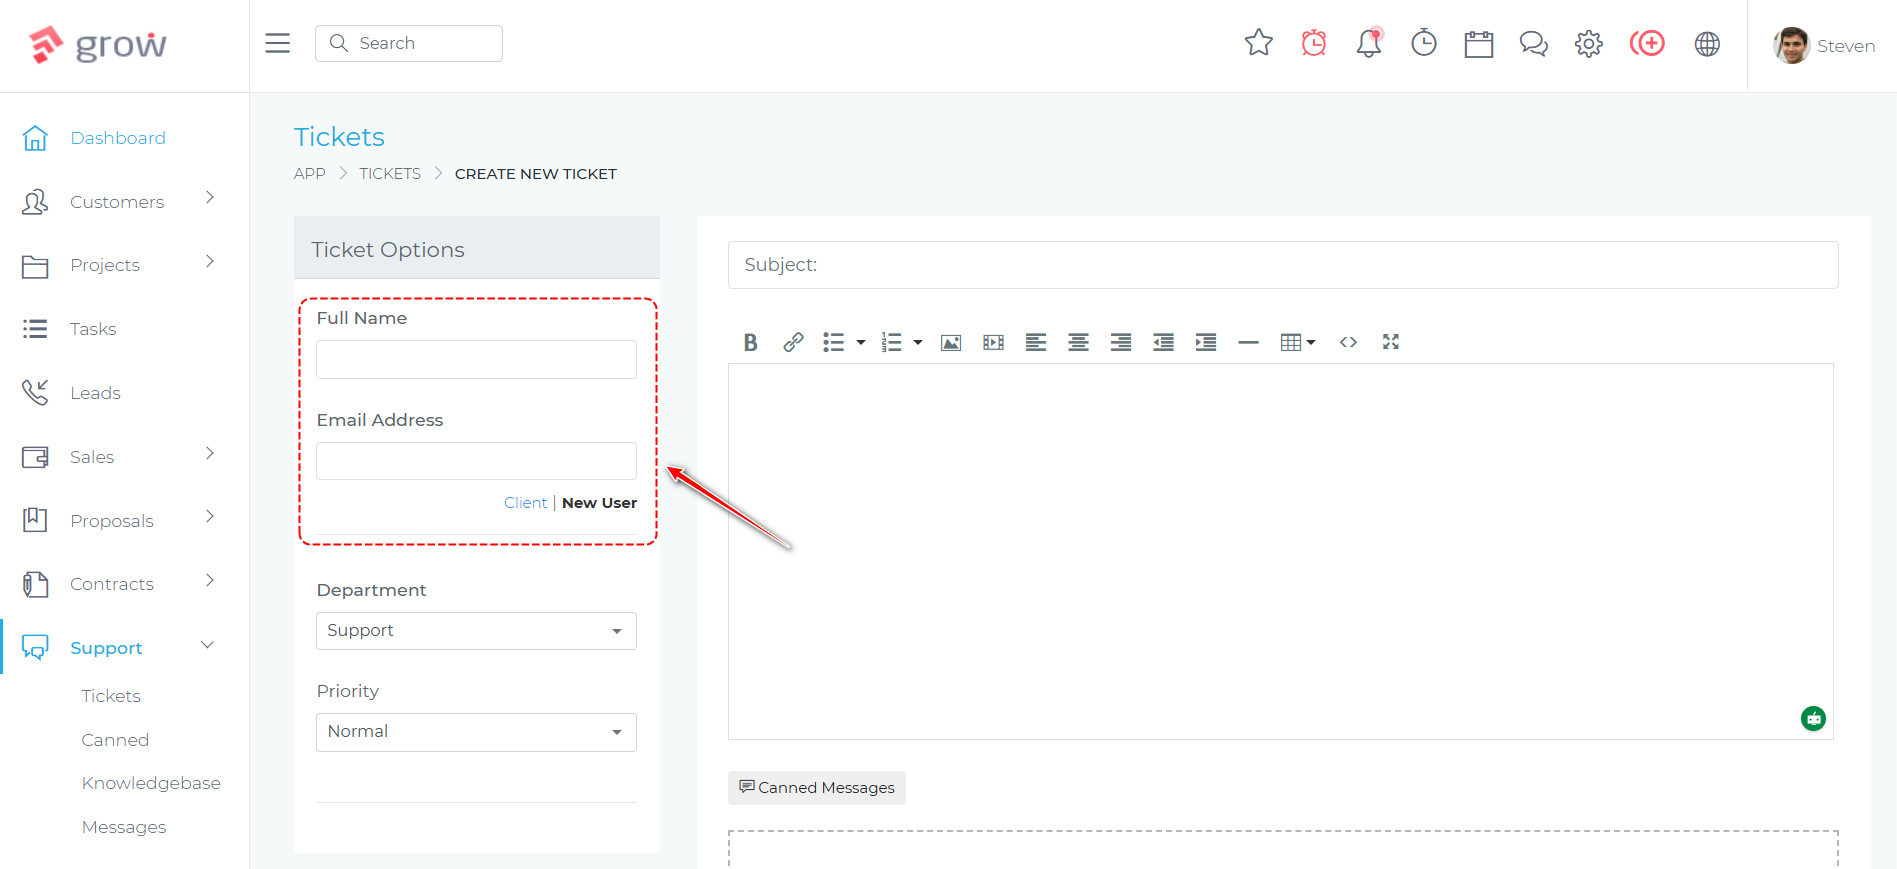
Send Support Tickets to Non-Clients
Previously, you could only raise a support ticket for a user that already existed in the CRM. Now, when creating a support ticket, you have the option to enter a name and email address directly. This means you can create tickets that originate from the CRM — sent straight to the recipient’s email inbox — rather than only processing incoming tickets via IMAP.
This is particularly useful for proactively reaching out to contacts, following up on conversations that started outside the CRM, or initiating support threads on behalf of clients who have not yet been added as users.
Quickly Close & Open Tickets with Bulk Actions
Managing support tickets is now faster and more efficient directly from the ticket list. Team members can close a ticket or change its status without having to open it — both actions are available inline on each row. A single click closes the ticket immediately, and the row updates in place without a page reload. For changing to a specific status, a dropdown opens a quick-select form right from the list.
When working through a batch of resolved tickets, the bulk actions panel now includes a Close Tickets button, allowing teams to close multiple tickets at once in a single action.

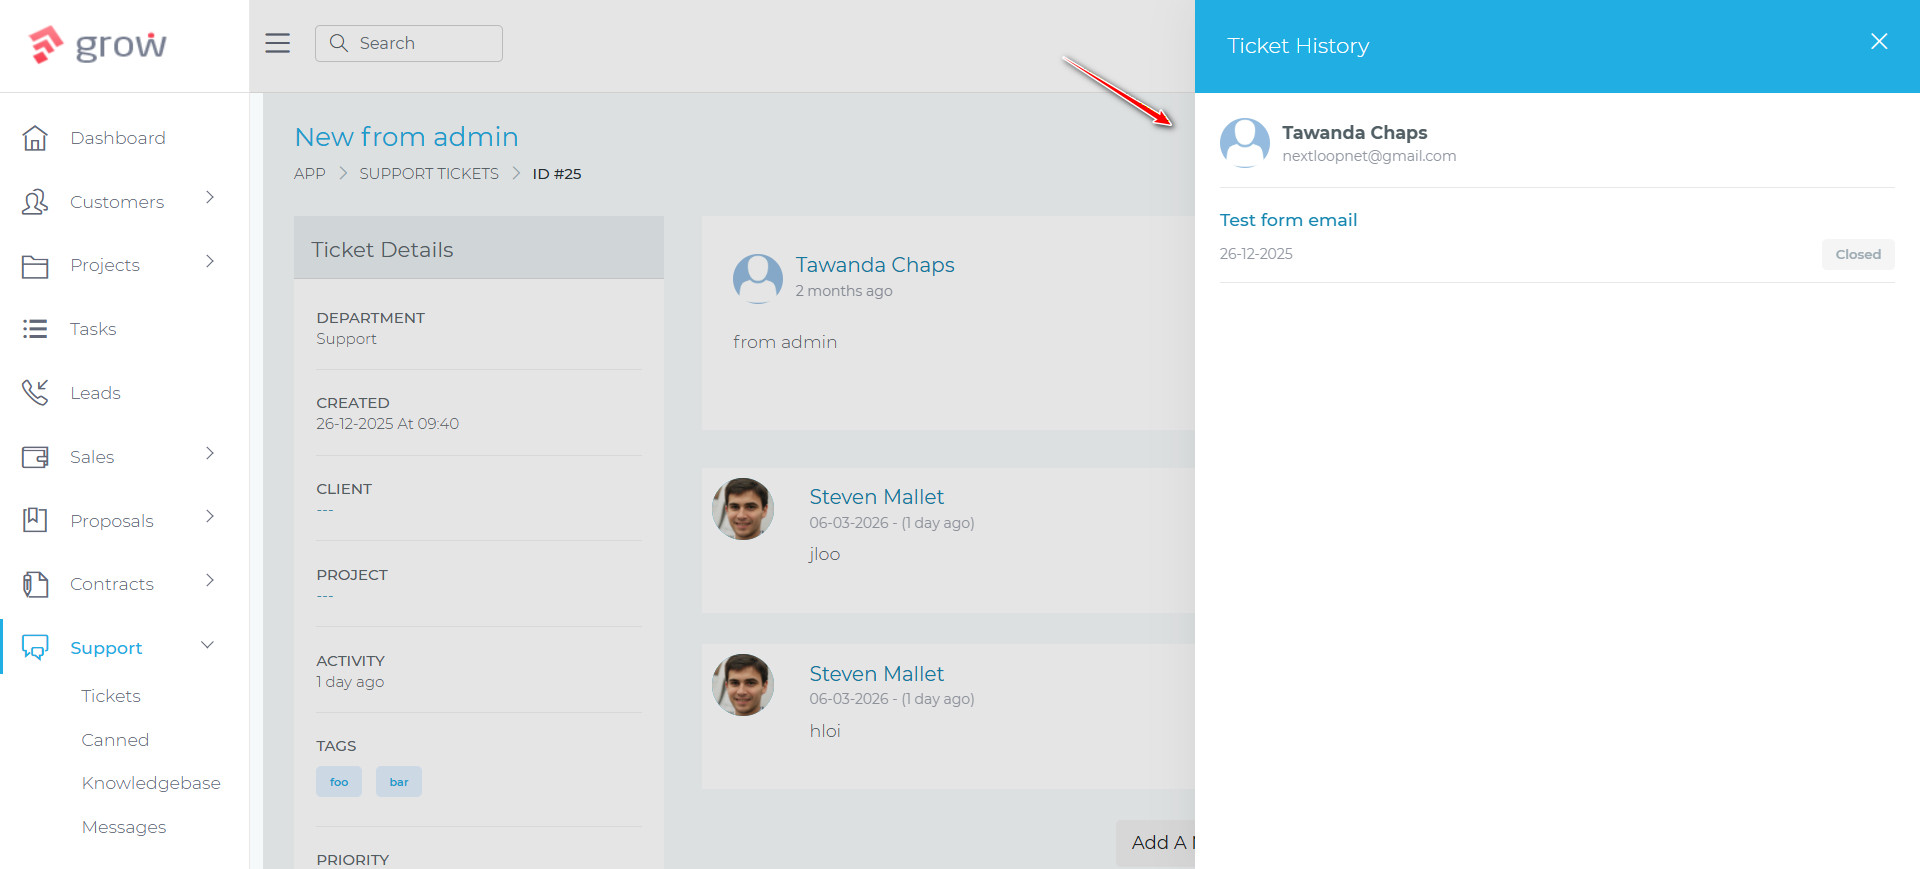
View User Support Ticket History
When a support team member is viewing a ticket, they can now click on the name of the person who submitted the ticket to instantly see a panel showing all of that person’s previous support tickets — without leaving the page. The panel slides in from the right side of the screen and displays the submitter’s avatar, name, email address, and company at the top.
Below that, a list of their other tickets shows each ticket’s title as a clickable link, the date it was submitted, and its current status. If the person has submitted many tickets, a “Load More” button allows the team member to page through the full history without the page refreshing. This gives support staff immediate context about a customer’s support history while they are actively working on a ticket.
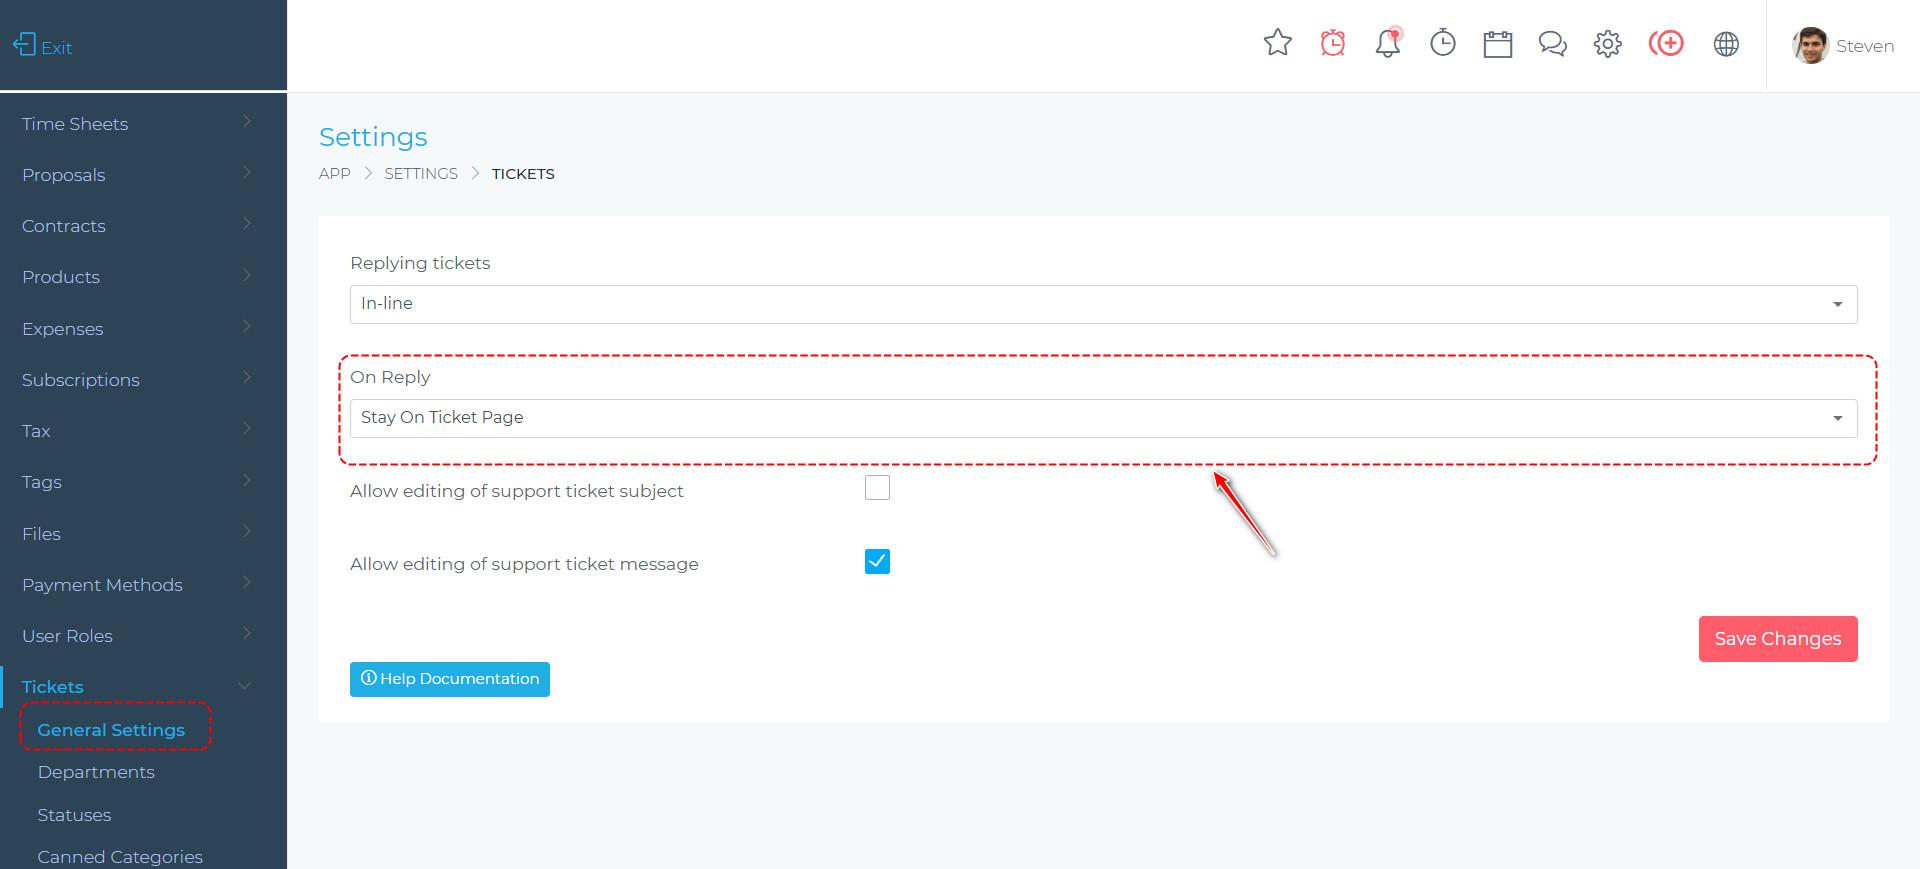
Ticket Reply Options
A new global setting lets you configure what happens after a team member replies to a support ticket. You can choose to stay on the ticket page — useful when you expect a rapid back-and-forth — or return to the tickets list, which suits teams who prefer to work through their queue sequentially. The option is set via admin settings and applies across the team.
Estimates & Proposals
Estimate Workflow
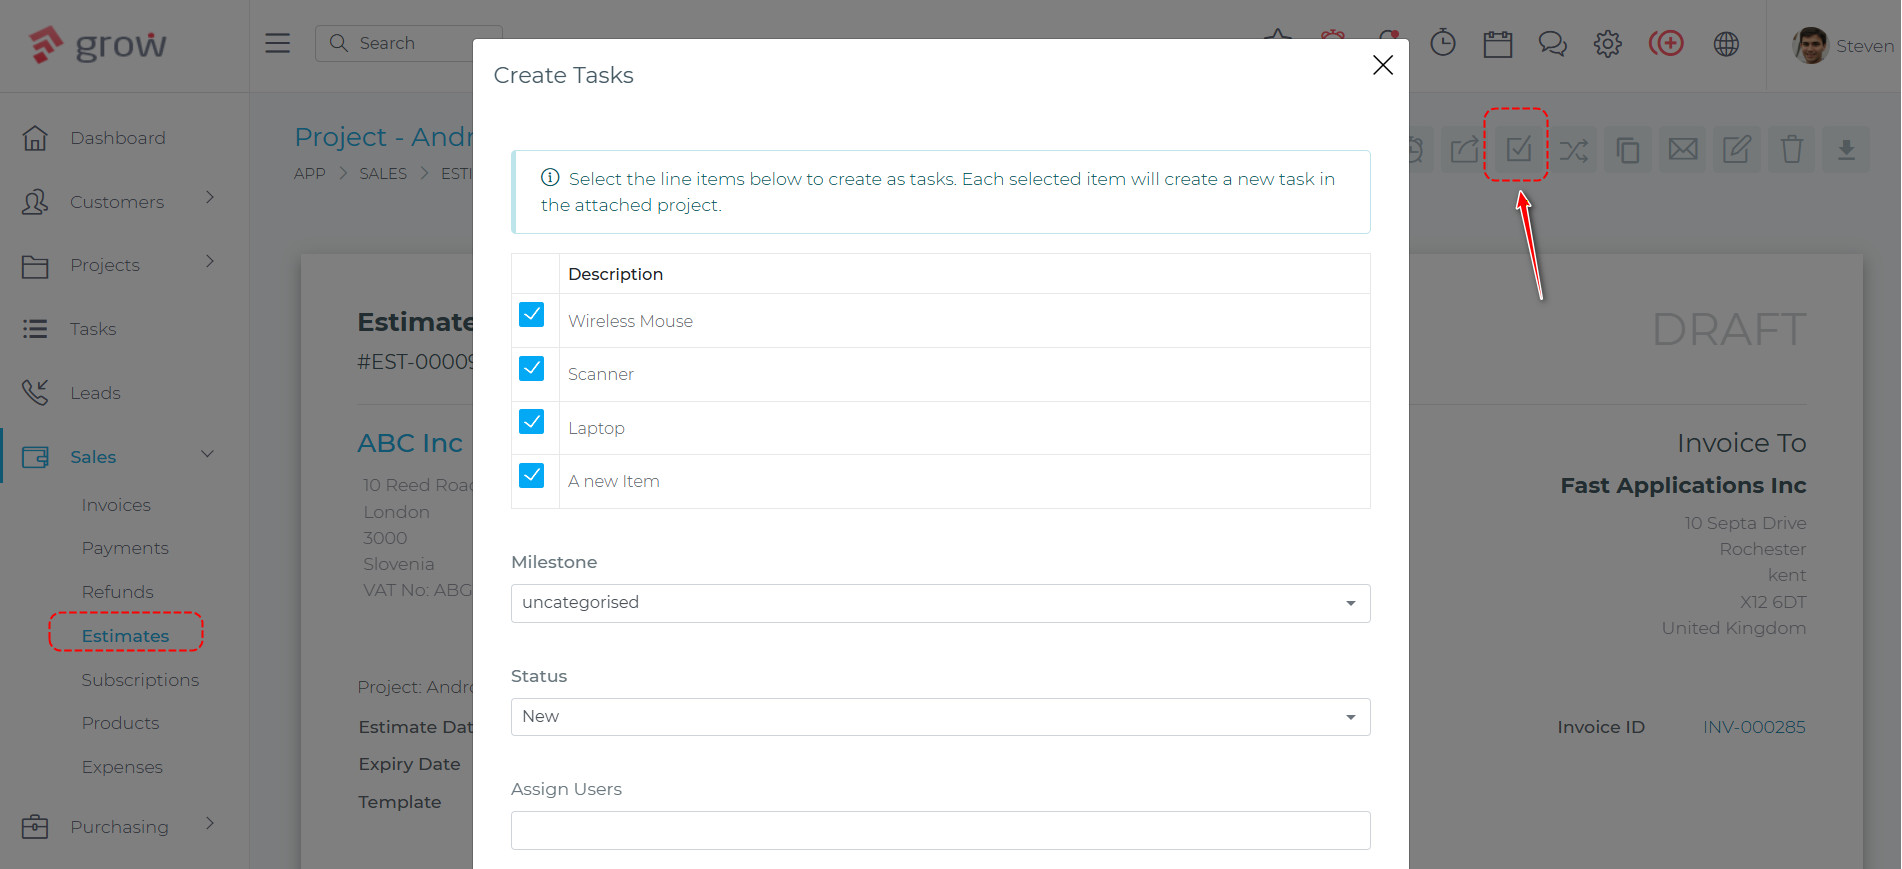
Create Project Tasks from Estimate Line Items
Users can now create project tasks directly from an estimate’s line items. When viewing an estimate that is linked to a project, a new “Create Tasks” button appears in the action toolbar. Clicking it opens a modal listing all line items from the estimate. Each line item is pre-ticked and can be deselected. The user selects a milestone, a task status, and optionally assigns team members. On submission, one task is created per selected line item and placed into the chosen milestone within the estimate’s project.
Line items that have already been converted to tasks in the same project are shown with their checkboxes disabled and greyed out, preventing accidental duplicates. If the estimate is not linked to a project, the modal shows an informational notice explaining that a project attachment is required.
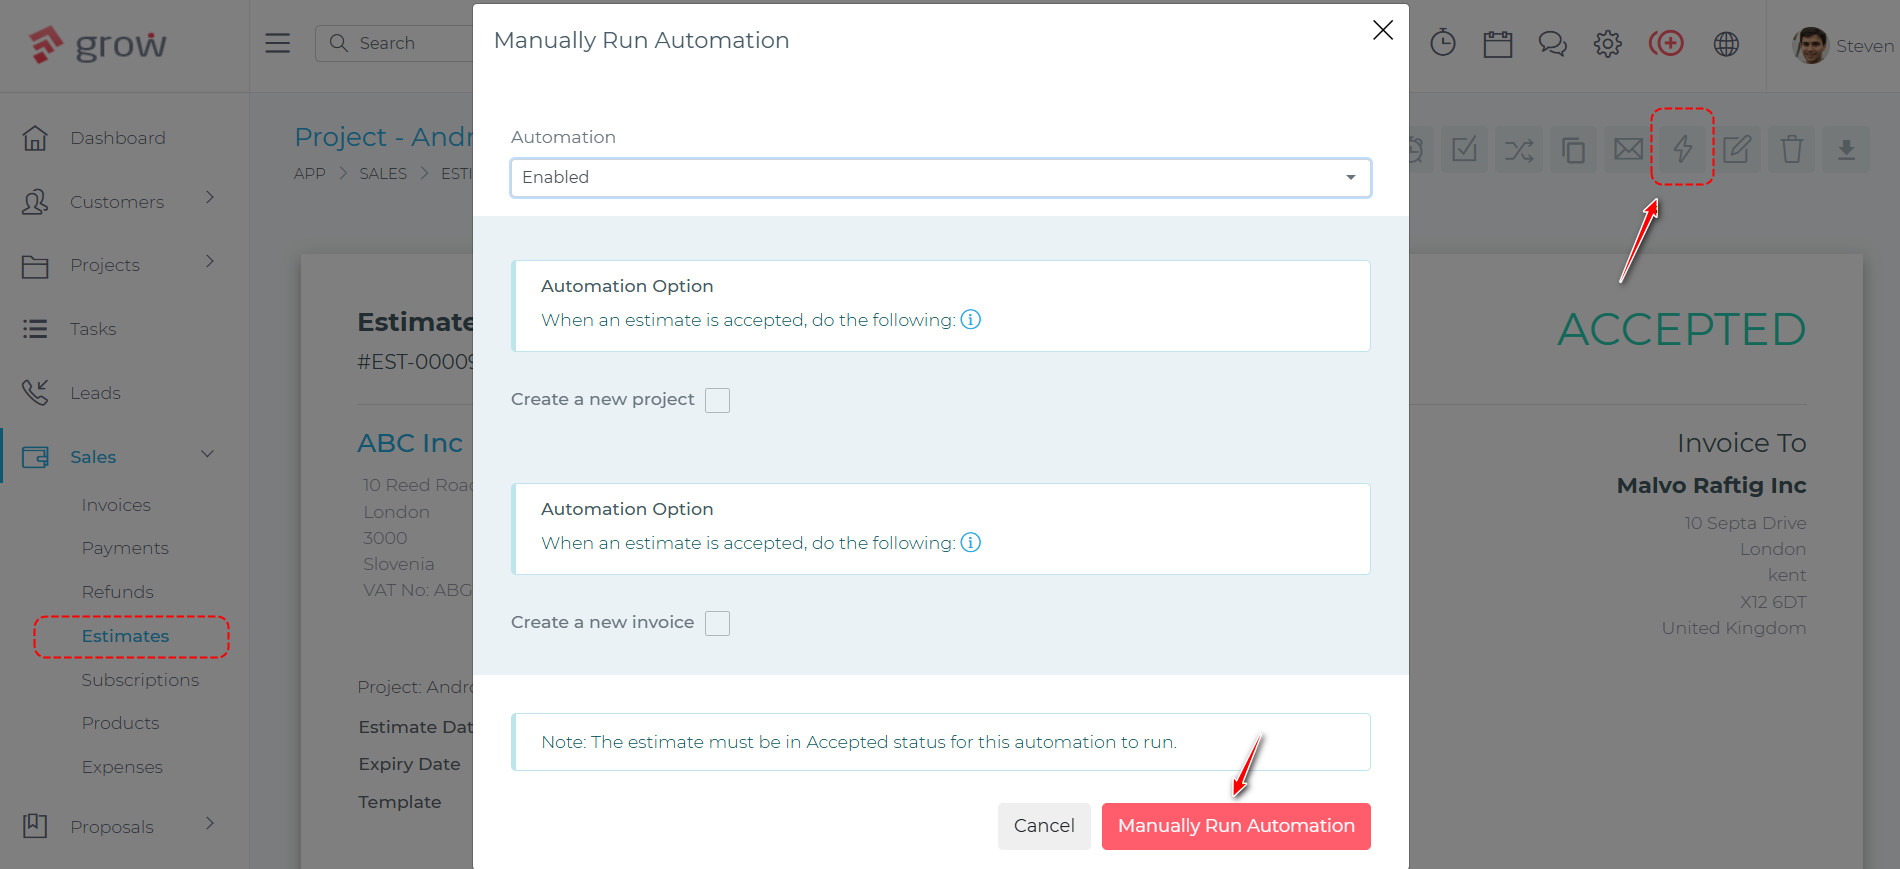
Manually Run Automations on Estimates
Admins can now manually trigger an estimate’s automation at any time — even if automation was never enabled on the estimate before it was accepted. Previously, the automation system would only run if the admin had configured it on the estimate ahead of time. If they forgot, there was no way to trigger it after the fact.
A new Automation button in the estimate view page’s actions bar opens a dropdown with two options: edit the automation settings, or manually run the automation immediately. When selected, the current automation settings are displayed in a modal. Clicking the run button executes the full automation process — creating the project, tasks, and/or invoice as configured — without needing to re-accept the estimate.
Bulk Disable Automation on Estimates
Users can now disable automation on multiple estimates at once directly from the estimates list page. Previously, removing automation settings had to be done one estimate at a time by opening each estimate individually. With the new “Disable Automation” bulk action, users can select any number of estimates, confirm the action, and all selected estimates will have their automation immediately switched off.
Proposal Automation
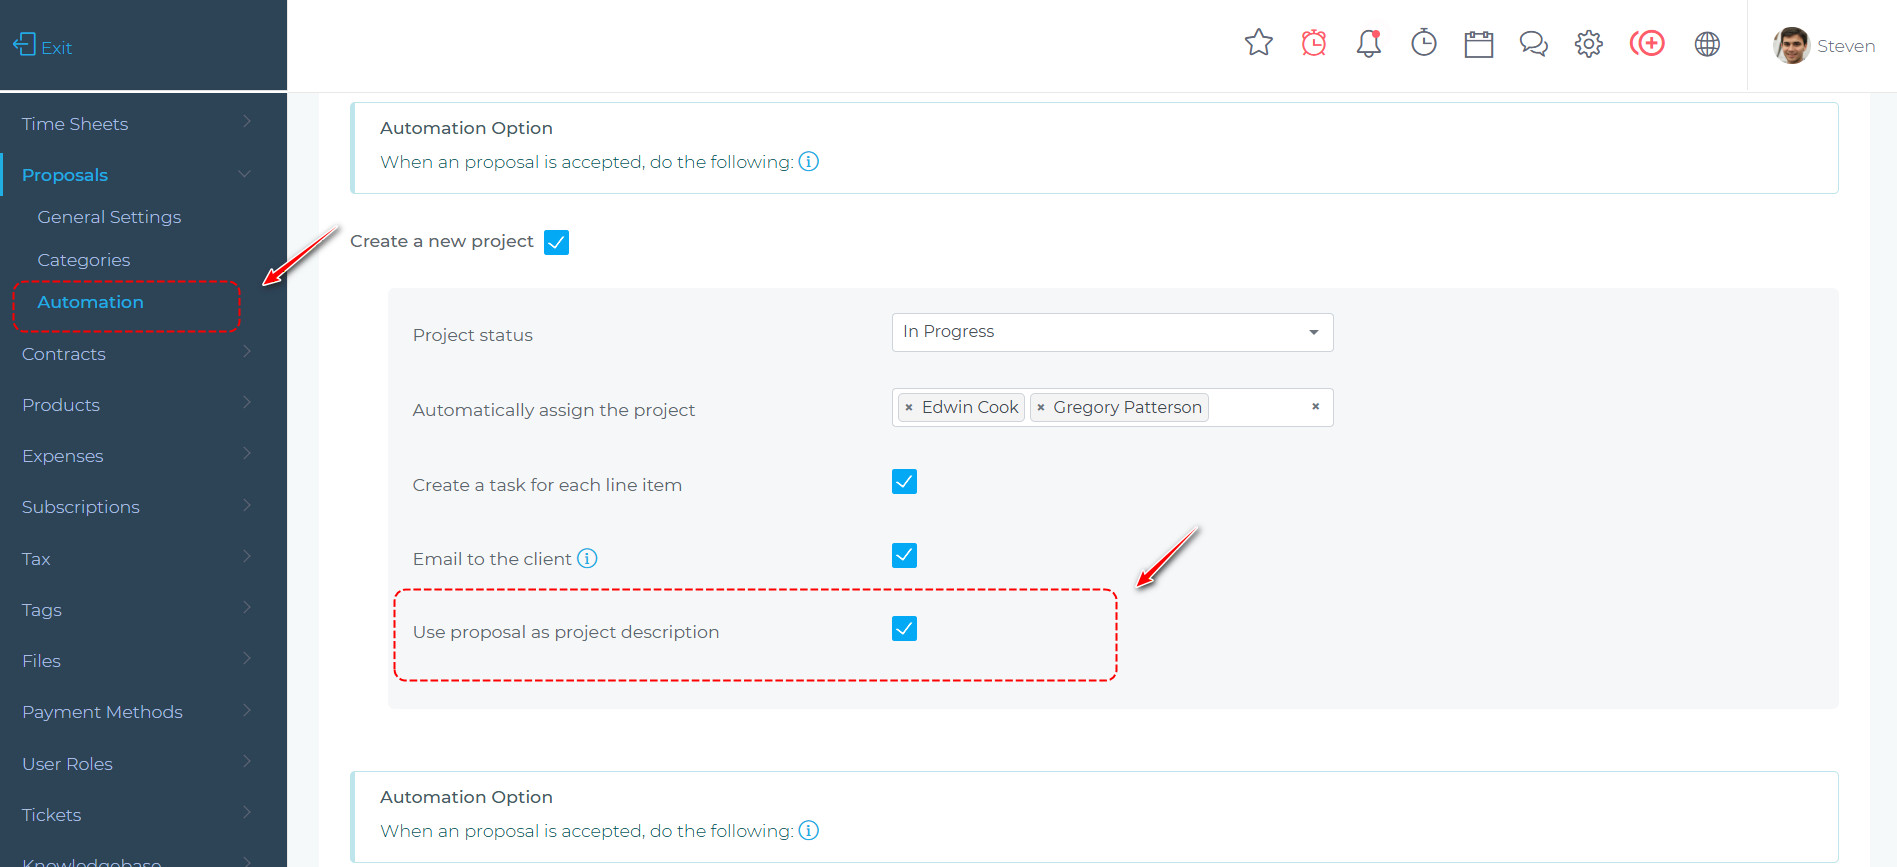
Use Proposal as New Project Description
When a proposal is accepted and automatically converted into a project, teams can now choose to carry the proposal’s content through as the project description. A new checkbox in the proposal automation settings — available both globally and per proposal — enables this option.
When turned on, the full body of the proposal is copied into the project description at the point of conversion, with all dynamic placeholders already resolved: pricing tables are rendered, client names are filled in, and any other variable content is substituted with its actual value. This saves teams from having to manually copy proposal content into a project after acceptance, and ensures the project record starts with a complete, human-readable description rather than a blank field or raw template tokens.
Tags Across the CRM
Flexible Categorisation
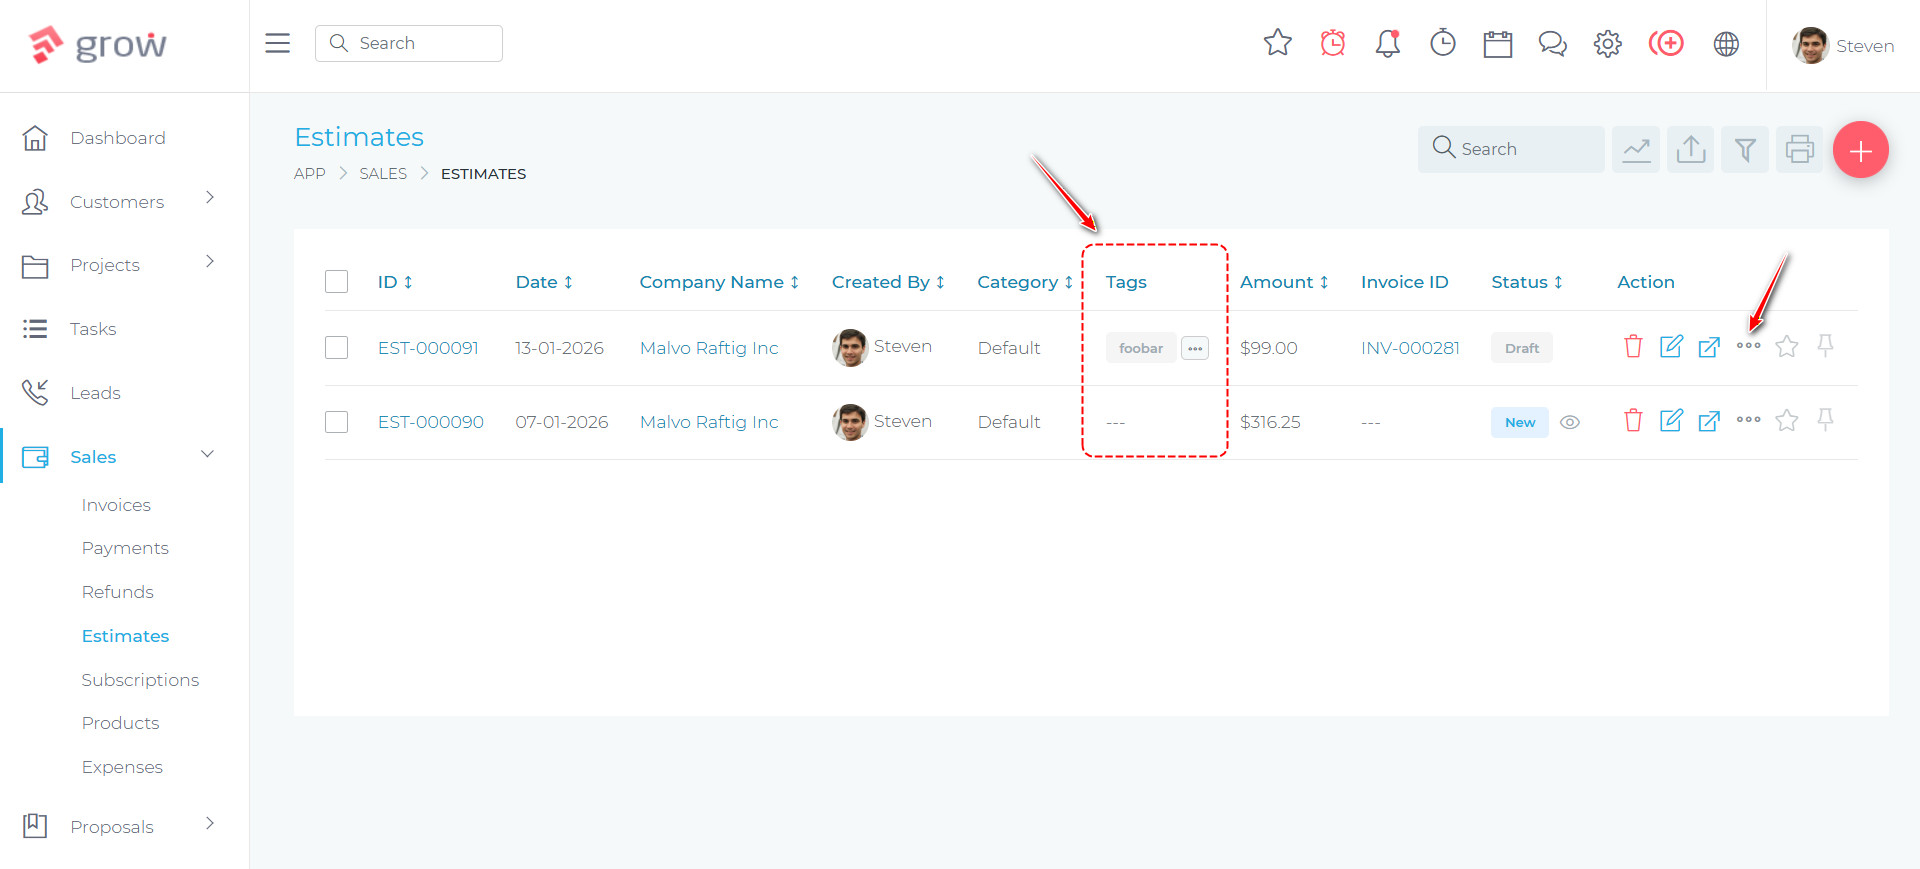
Add Tags to Invoices, Tickets, Estimates, Expenses, Proposals & Contracts
Tags can now be added to a broad range of record types across the CRM, giving teams a flexible way to categorise and find records without relying solely on status or date filters. Tags can be added when creating or editing a record, and can also be updated at any time directly from the list page using the “Edit Tags” option in the row actions dropdown — without opening the full record.
Each list page includes a Tags column so tags are visible at a glance, and the filter panel now supports filtering by one or more tags. This makes it easy to pull up all invoices for a particular campaign, all tickets related to a specific product, or any other custom grouping your team defines.
Productivity & User Experience
Focus & Navigation
Distraction-Free Viewing Mode for Tasks & Leads
The Task View page now includes a Distraction Free Mode toggle, giving team members a cleaner, more focused workspace when working through a task. With a single click, the surrounding navigation and interface chrome is hidden, leaving just the task content front and centre. Clicking again restores the full view.
Each user’s preference is remembered between sessions, so the page always loads in the mode they last chose — no need to toggle it every time.

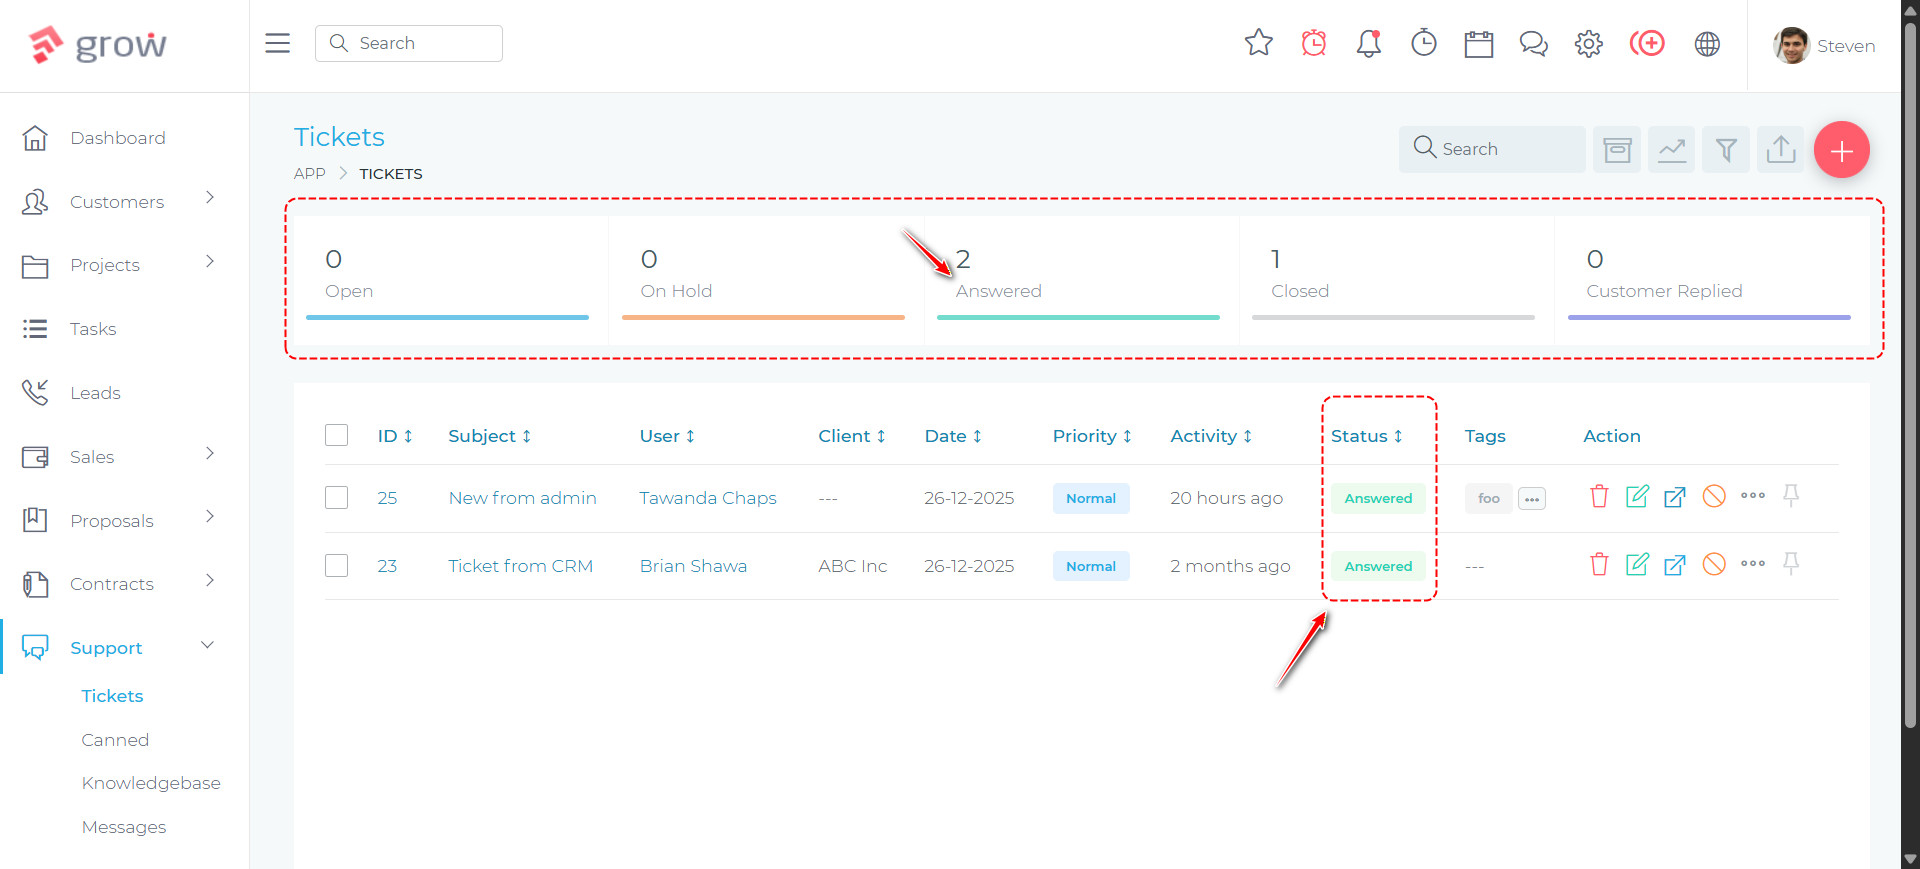
Clickable Stats Panels
The stats panels at the top of the Tickets, Projects, Invoices, Payments, Estimates, Proposals, and Contracts list pages are now clickable. When a user clicks on any of these panels — which display counts such as Open, Paid, In Progress, and Closed — the page reloads showing only records that match that status. The selected panel is visually highlighted to indicate it is the active filter.
Any previously saved filters are cleared automatically when a panel is clicked, ensuring a clean, focused view. This makes it much faster to get a quick breakdown of records by status without having to open the filter panel manually.
Editing Improvements
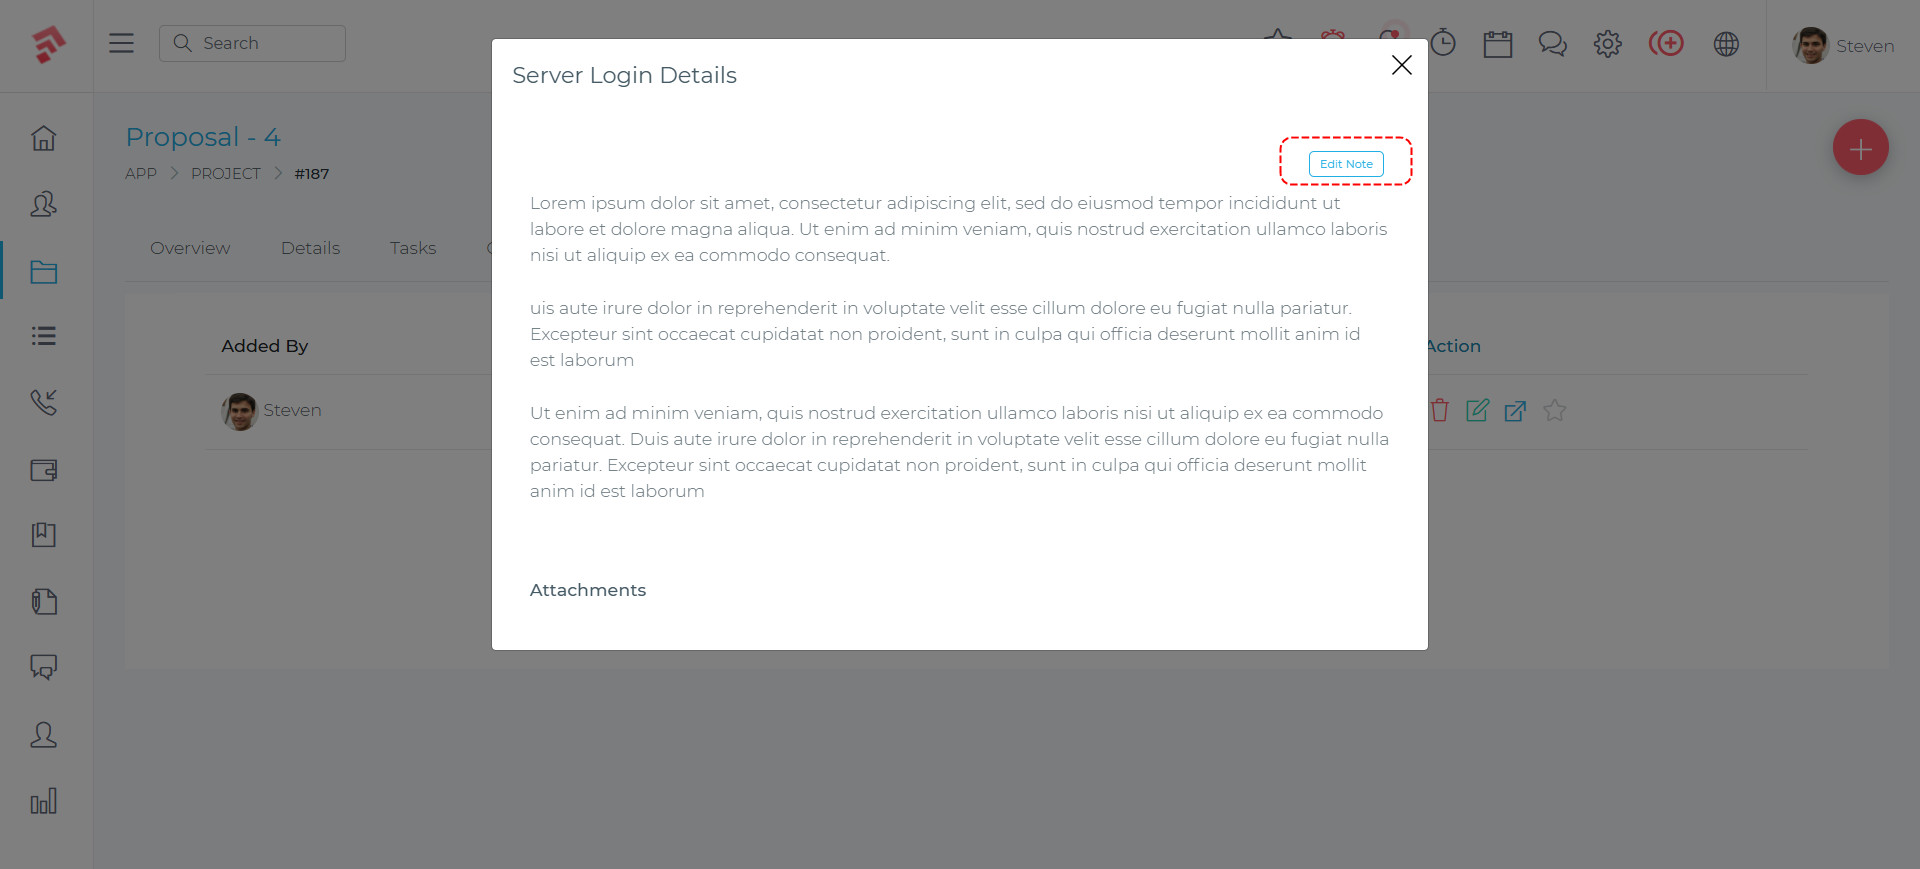
Quickly Edit Notes
When viewing a project or client note, there is now an edit button that allows you to enter editing mode immediately. Previously, editing a note required navigating to a separate form. This small but practical improvement saves time whenever you need to make a quick correction or update to existing notes.
Why These Updates Matter
⏱️ Save Time
Bulk actions across invoices, estimates, and tickets eliminate repetitive one-by-one updates. Clickable stats panels and inline editing cut unnecessary navigation out of everyday workflows.
💰 Get Paid Faster
Direct invoice payment links mean clients can pay instantly from their email, with no login required. Flutterwave broadens your payment options for clients in Africa and beyond.
📊 Accurate Reporting
Refunded payments are automatically excluded from the Income Statement. Formal invoice cancellation with required reasons keeps your records clean and auditable.
🎯 Better Organisation
Tags across invoices, tickets, estimates, expenses, proposals, and contracts give your team a powerful and flexible way to categorise and filter records.
🔄 Smoother Automation
Manually trigger estimate automations at any time, carry proposal content into new projects automatically, and bulk-disable automation on multiple estimates at once.
🧑💻 Focused Work
Distraction-free mode for tasks and leads, quick note editing, and ticket history side panels all help your team stay in context and get more done without switching screens.
🎉 The best part? As a Grow CRM customer, you get all these features with your existing license — no upgrade fees, no additional costs. Just log into your CRM settings and download version 3.2 today!
Need help installing this update? Have a look at our Updates Installation Service. We will install the update for you.